Tuesday, March 18, 2014

How to Use Sewing Pattern, Acrylic Medium and Inks to Build a Mixed Media Subtrate

Students and others often ask about my mixed media substrates.  I use a variety of different methods for building backgrounds and underlayers for my mixed media paintings.  Here is a short visual tutorial about building a simple and easy visually exciting base for a mixed media painting.  


Wistful
8"x8"
Mixed Media
sewing pattern, inks, matte medium
prisma color, oil pastel, gloss acrylic medium


You will need the following -

  •  A canvas,  piece of masonite, canvas board or piece of heavy
       (at least 140lb) watercolor paper as a support for your substrate

  •  Acrylic Matte Medium

  •  Sewing Pattern

  •  Water Based Acid Free Inks in colors you love 

One of my favorite underlayers is created with old sewing patterns and these are available practically or actually for free - ask around.  Sewing patterns go out of style so people give them away or they can be bought for a few cents at thrift shops, garage sales and church rummage sales.  I sometimes use the sewing pattern with all it's lines and printing and allow this to come through my painting as part of my design - other times I cut out the patterns so that I am starting with the creamy tissue and no writing or print.  I love the surface it creates and it is a joy to paint and draw over.  It has a vellum like quality. I love the way it randomly absorbs ink and how it grabs media in different ways where it overlaps - it gives you lots of surprises and therefore creative options.


top left - Canvas Board, Top Right - Acrylic Matte Medium
Bottom Left Sewing pattern sheets, Bottom Right Sewing Pattern cut into large and Small Pieces


Choosing Acrylic Medium  -  Feel free to use any brand or grade of acrylic medium you like for this project as long as it is acid free.  I like the liquitex that I am showing here - it is reasonable priced and does the job.  You can buy something much pricier, or less expensive and get the same results. Please do not substitute Modge Podge - this will not work because you will want to go over this with paint, color pencil, ink pens or whatever your medium of choice is.  Acrylic Matte is the best for this, you can continue to add layers of this medium as you work to set the under layers.  I often work in oil pastel with acrylics and/or gouache and prismacolors.  I use Acrylic Matte in between to set and hold the layers -  Also do not use Gloss medium is too shiny and also will not work as it will repel your over layers.  Just so you  know,  you can go over gloss with a layer of Matte if you have made this mistake and keep rolling along - yes I have done this so I know this from personal experience!

top left and right - adhere sewing patterns to top and around sides,
 by painting under and over with acrylic matte med
Bottom Left - Acid Free Water Based Ink
Bottom Right - Adding color to substrate


When choosing an ink for your substrate you want to find a water based acid free ink.  Here I am using glimmer mists which I really like - it is both water based and acid free.  The version I have here also has the additional advantage of coming in a spray bottle which I like very much - it has a very small amount of irredescence - which I also really like and it comes in lots of colors that work with pallets that I like.  You can really use any brand - brush or spray - what ever you like - as long as you go for water based ink that is acid free.

Why water based? When you spray or brush onto your new surface you can rub off as much as you like, if you feel like you have put too much on, you can brush or spray on water and pull more color off or create other loose watery effects - water based inks flow nicely together and blend really nicely over the paper as well. Here I am only using ONE color but please feel free to experiment - I often use several on the same canvas.


Top Left - Rub, apply and remove some color with Paper Towel and/or Water
Top Right - Step back and admire
Bottom Left - speed up drying time with a hair dryer
Bottom Right - Get to work on a New Painting!


After spraying or brushing on the ink(s) rub or pull off some of the color until you are happy with the distribution of the color.  You can brush on and pull off more with water, add more color and continue to remove and add color with inks and paper towels.  When you are happy with the results - you can speed up your drying time with a hairdryer.  Your finished substrate is now ready for you next mixed media project!

I like to create several substrates at one time. Sometimes I don't add any color but other times I will just start a warm or cool pallet with a wash of one warm or cool color to start and then choose to add more colors or not later.  I can then go in and grab a pre-made canvas and go when I have an idea I want to explore.


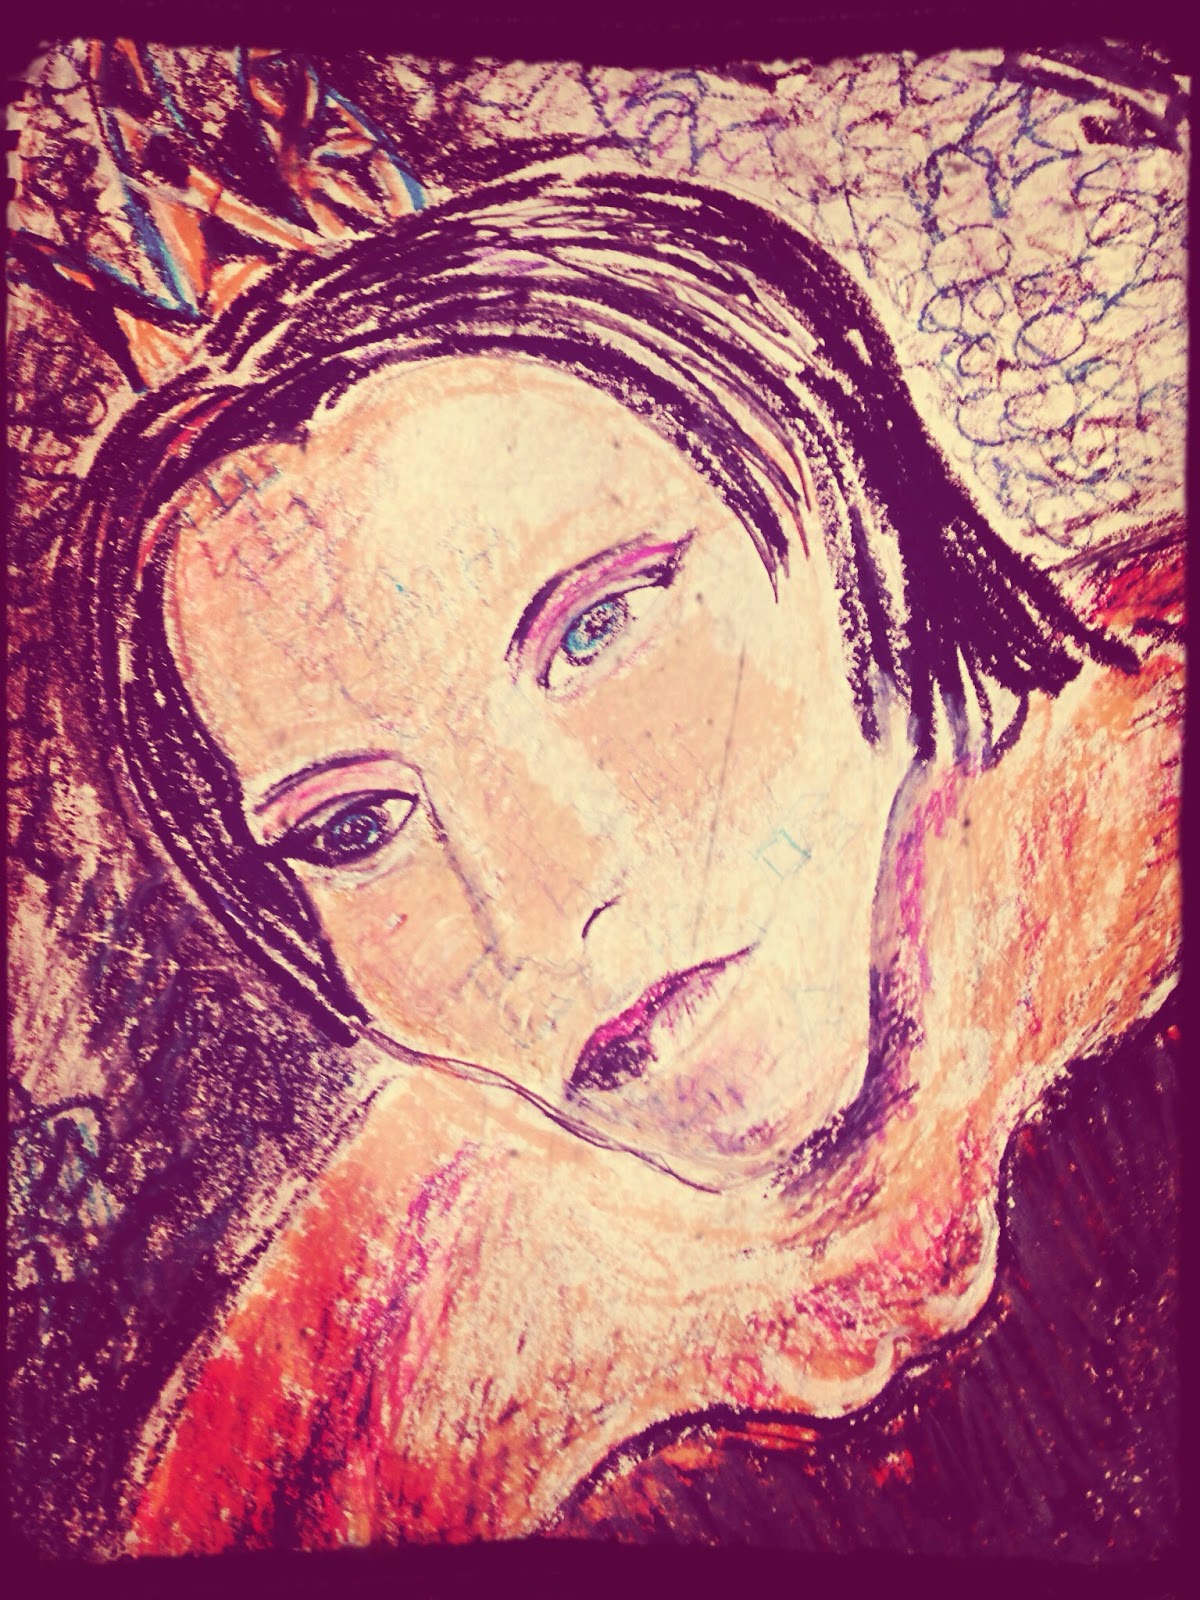
Mixed Media Painting in progress.
Prismacolor drawing over prepared substrate  as shown above with sewing pattern and inks.
The softness of the inky wash over the creamy paper make it easy to create a moodiness
even though I am only about midway through this painting.


I hope you enjoyed this tutorial on creating a substrate.  Please check back and follow my blog for more tutorials, posts and artistic meanderings.

Namaste,

Marcy            


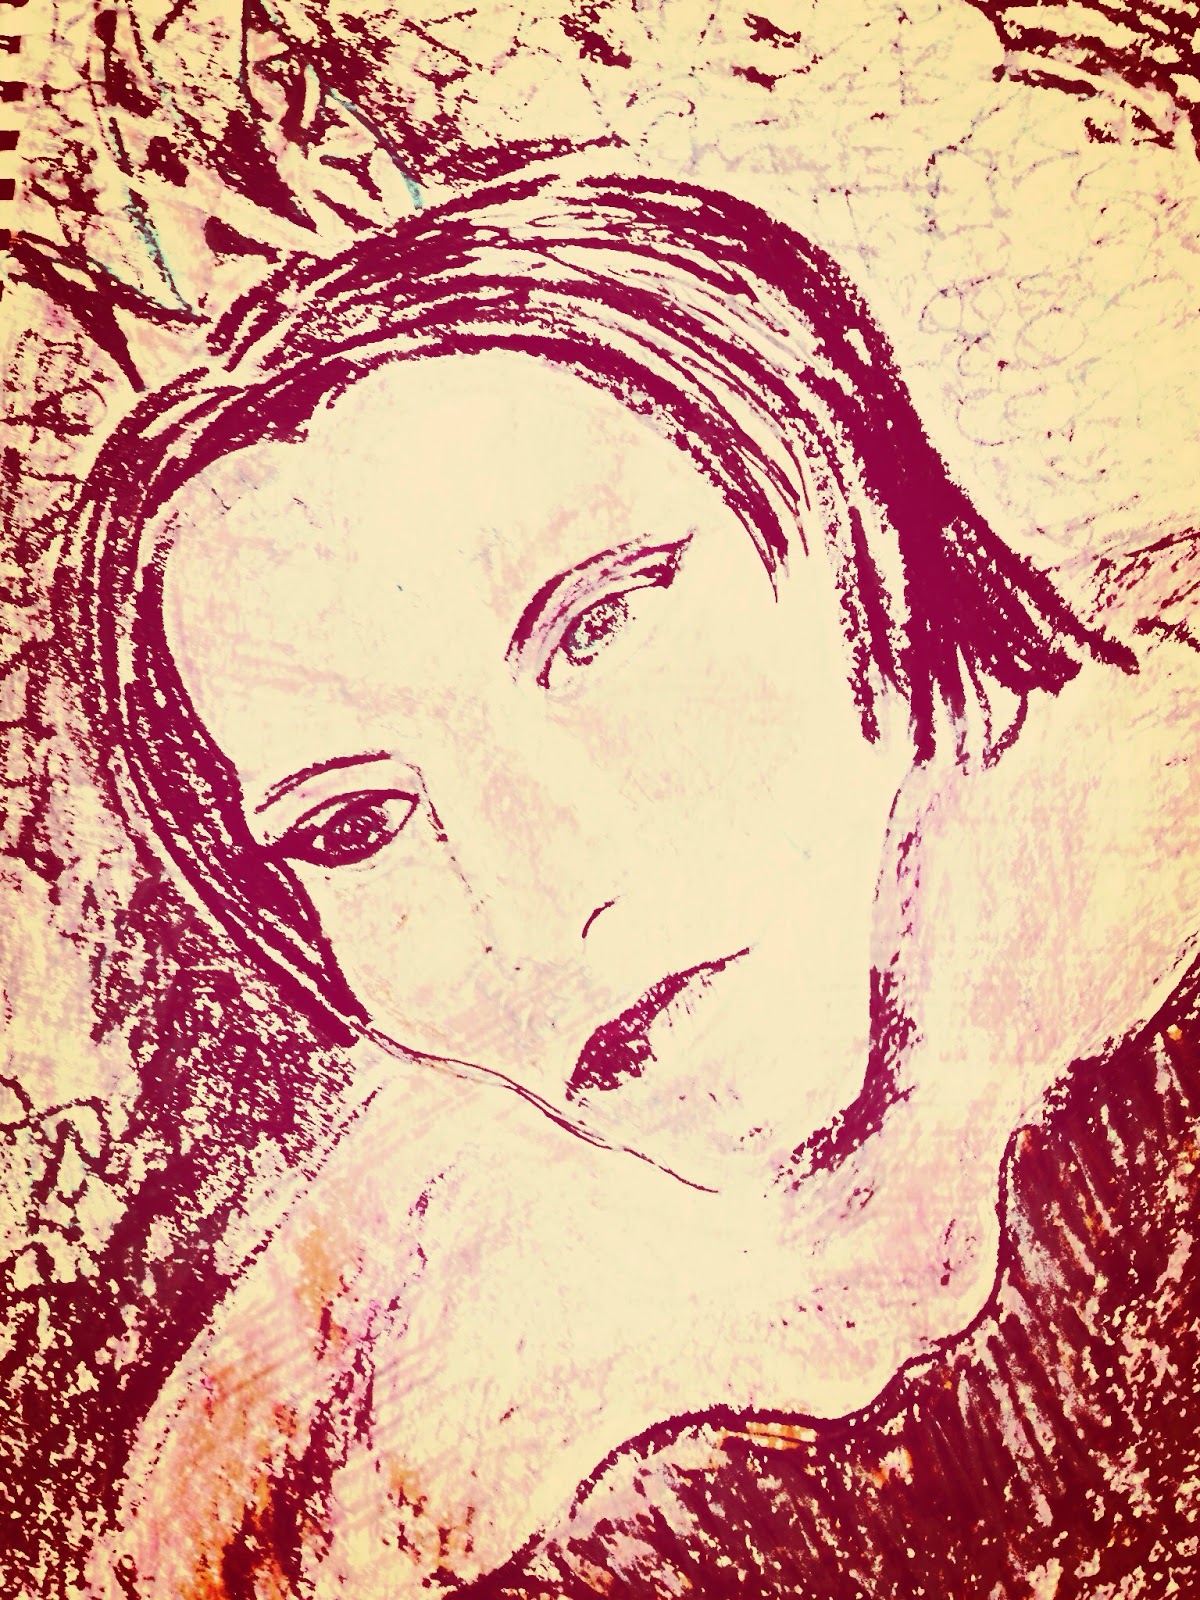
Mixed Media Painting "Wistful" by Marcy LaBella
Digitally Altered


Monday, March 17, 2014

Creativity, the Daily Grind and that Darn Procrastination


Procrastination – everybody does it…it seems that there is a myriad of ways to talk yourself out of sitting down to your creative work.  Your day job, hectic schedule, and family commitments, the reasons are endless. Let’s add in Facebook, Texting, Twitter, gaming and TV and today’s list goes on forever; so what can an artist do to become more productive and avoid these pitfalls and other lurking distractions that keep us from our drawing boards?

I  really wanted to  think about the ways we can become more proactive and get more creative work done.  Because creative work is so connected to us emotionally and so personal to us as artists there is a lot of fear connected with its potential failure or success.  Your procrastination could be partially due to fear which is one of the many roadblocks to creativity, just hiding in another form.  Being more aware of this is a step in the right direction.  

everthing you want is on the other side of fear

George Addair 

Set up a work zone – this does not mean you need a state of the art studio with skylights and high tech equipment – A small desk top or even just a sketchbook, pad and pencils can be enough to generate ideas for future work.  My painting studio is unheated so in the winter months I do small scale mixed media paintings on a TV tray and do lots of drawings and sketches to develop ideas for my work in metal and clay.  I also sketch out and produce samples for my children’s art projects in the same manner so please work with what you have – no excuses.

Anti-Procrastination Prompts and Ideas

1.    Set up a Work Zone – a small corner in an office or living room where there can be a small drafting table would be great…in a pinch a desk top, dining table or any other flat surface will work.  Anywhere you create art is your studio – basics for creative work are your sketchpad, pencils and eraser – get going.


2.    Set aside a window of time to work each day – be honest with yourself – and commit to this time daily even if it’s 20 minutes – you may surprise yourself by spending more time.  If you don’t have an idea – tidy up your space and organize your supplies during your time.


3.    Commit your ideas to paper - Creative people will often generate ideas during times when they cannot work on them.  Keep a small pad and pencil or pen with you at all times.  If you are musical, access the voice recorder on your phone, writers can jot down a phrase – When you are pressed for time just get the ideas down quickly so you can revisit them when you have more time. 
 

idea sketch for a ceramic sculpture


Other Creativity Killers

Of course we all know that healthy food and exercise are important to being our best.  Don’t forget about sleep…you can’t be creative on a steady diet of pizza, soda and 5 hours of sleep every night …  try getting in earlier and getting to bed and your productivity is sure to climb. 

Don’t be a Martyr

While you are working towards the goal of improving productivity don’t forget to take a break and play every once in a while.  A creative play date with a friend gallery hopping, or a day at the beach can be just the thing you need to get back to your work with new eyes.


By becoming more aware of the many distracting factors that lead us into procrastination, finding proactive solutions and ways to overcome them we can become more creatively productive. Now get off the computer and go make something!
ALL IMAGES ARE SKETCH BOOK PAGES
DIGITALLY ALTERED

Namaste,

Marcy                                      

Tuesday, March 11, 2014

How to Create Fearlessly in A Perfectionist Society


All kidding aside, what does it really mean to create fearlessly?  Being able to create without fear is being able to firstly be kind to ourselves. To leave our judgments at the studio door, to allow our childlike wonder to be free to imagine the possibilities that are ours to create.   When we give ourselves the permission to try something completely new we can open doorways to expanded horizons.

Creating a place in our hearts to be kind and non-judgmental is crucial to creativity and something I insist on in my art classes; whether you are working in a group or alone this is of upmost importance.  You should be kindest and least judgmental of yourself, something that is so difficult for many of us. Approaching any artistic endeavor with this outlook will allow you to be empowered to fully explore the many options and simple joy of creative play and experimentation that is critical to any developing artist.


When you are approaching your project, embrace your ability to allow your ideas to freely flow.  Having decided upon a non-judgmental sacred space we can take away the burden of “wrong”, “bad”, “I messed it up”.  Have you ever watched a very young child do a watercolor or tempera painting?  They joyfully dip their brush into the colors and paint happily away. They become completely immersed in the task and don’t give a second thought to the finished work; in many cases they have not thought that far ahead.  They are completely immersed and engaged in the process of painting, they have no expectations and therefore – no limitations.  They are in a clear and unencumbered in a completely creative, intuitive mindset.


While you are at your work it is very easy to find your groove, your niche or “thing you do” and do well. To make creative leaps and bounds you need to push the edges of your comfort zone and push those edges regularly. When it gets too easy it’s time to shake things up a little, if this scares you, that’s good! It means you are approaching the edge of your comfort zone and that can be a little un-comfortable. Some of your greatest breakthroughs will come at the edges of the comfort zone. Push past these and you will be free of the fear that is holding you back from your highest potential Does any of this sound strangely like life?


So go to your studio or co-create with a friend, do it in a non-judgmental creative sacred space.  Give yourself permission to be more childlike in your wonderful ideas and push your edges – you will surely grow as an artist.  Any life lessons taken beyond the studio doors are entirely up to you.
 
All Images Are
Sketch book pages
graphite on paper digitally altered


Namaste,    
Marcy


Thursday, March 6, 2014

Making Art With Children

Big Happy Faces   - A Big Happy Face
                                                                              A Big Happy Face by Zaire 1st Grade
Making Art with children is always fun and inspiring.  I am always trying to get them to fight the urge to draw teeny tiny things and grow their pictures to the entire dimension of their paper and beyond it.  In my opinion it is the only problem they face since we are all born with an innate ability to be creative in a natural way.  This lovely expressive portrait was done in my YMCA after school program by a lovely little 5 year old girl named Zaire..picture the biggest brown eyes, a head full of elaborate braids and clad head to toe in little girl pink.  She sat down and did three of these and insisted this one was for me to take home...so cute.  There is so much we can learn from the way children approach artwork and life in general they are often overlooked as the wise beings they are.
 
We had so much fun I decided to do this with all three of my 1 - 2nd grade classes the following week -  Big Happy Faces were a hit with the kids - the ones below are done by first drawing in Oil Pastel on Watercolor paper and then painting with water color.


Tuesday, March 4, 2014

Ostara - Goddess of Spring

Since I was layed up for a lot of time this winter I haven't done much in clay.  I was able to do this one sculpture "Ostara" in mid-January -  This is done in white stoneware clay,  fired to cone 6, coiled, porcelaine slips, underglazes, engobes and oxides.  The body cavity contains a natural sparrows nest.

Monday, March 3, 2014

New Work in Mixed Media Painting

What a winter - really feeling the cabin fever - I had a serious case of bronchitis followed immediately by gall bladder flare ups and then surgery - yuck.  That with the non - stop snow in Connecticut made for an awful winter - I cannot wait for spring. 

Since I haven't been able to get out much I did discover I was able to work on some small scale mixed media painting projects.  Normally I work in a large format - at least 14" x 16" or 20" x 20". 

One of the art centers where I teach Guilford Art Center in Guilford, CT  http://guilfordartcenter.org/

has a wonderful idea for a fundraiser called "The Art of the Cocktail". It features art the size of a cocktail napkin.  Arts center artists and teachers donate 6" x 6" sized art works for this fun evening fundraiser.  I had a great time working up these mini canvases for this fundraiser and then a good friend and fellow Wesleyan Potter  http://www.wesleyanpotters.com/


Contemplation ....gallery wrapped canvas 8x8 $275 available

 colleague Cheryl Tuttle came over with a box full of 8"x8" canvases for me to continue my in house painting explorations -                                         

No Fear..... 6" x 10"  $155


Fierce 6"x6" donated
 
 
6"x6"  Soul Beauty - donated
 
 
Angelic - 6"x6" - donated